Entered Information
| Student Name: | Trenton G |
| Grade: | 12 |
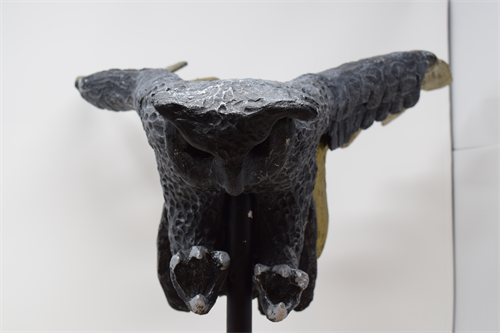
| Title: | No Eyes |
| Description: | When deciding what to make for a sculpture I went with one of my favorite animals. I have always loved owls and multiple online tests have stated that my spirit animal is an owl, so naturally that's what I chose. I knew the main problem with creating an owl from clay would be the wings, so I decided that I would have to make the body and the wings separately. I first started with the body by just blocking out the basic shapes for the head, body, legs and tail. It was hard to get the proportions right because every picture I looked at was different, but I was able to find a few that showed the anatomical structure and structure of the muscles. After I had blocked out the basic shapes I started taking off clay and basically "carving" the shape of the owl out of the blocks that I had to work with. I have always loved carving, so this was easy for me. After I had a decently proportionate body, head, legs, and tail for the owl, I moved onto the wings. The main part I needed to get right was the curve of the wings. I knew I wanted the owl to be diving in to get its prey so I sat the body up on a piece of pvc pipe in the position it would have in flight. I then made rods for where the bone structure of the wings would be and waited for them to dry to a point where they would hold shape, but also be malleable. One they both got to this point I held them up to where the wings would protrude from the owl and shaped them appropriately. After they were shaped I sat them up on foam for them to dry even further so they would hold their shape. While they were drying I started hollowing out the owl. While hollowing I had accidently poked some holes into him including where the eyes were at. Instead of trying to put eyes back in I took them out all together. Once the hollowing was complete I started on detailing. For the detailing I used a loop tool to carve out little indentations that would suggest feathers. The feathers on an owl aren't very long, they're more short and fluffy, so I did shorter, tighter carves. When I came to the tail I switched to carving out what look like longer feathers because owls' tails are basically just long feathers. When doing the ears I did the same thing but just shorter. I wanted them to look like they were fluffy. While detailing the ears I accidently broke his right one off but I decided to keep it that way because I didn't want the owl to look too "pristine". The owl reminds me of the guardians from the book Guardians on Ga'hool, so I decided to keep that aesthetic going throught the whole piece. When I moved on to the claws I didn't want to make them super realistic because owl claws are long and thin which would not be good because they could break easily. Instead, I decided to make them more stylized but still retain the idea that they are claws open for the kill. Once again, I had broken off a piece of the owl but this time it was a claw. Instead of trying to reattach it I just left it because it fit the aesthetic I was trying to reach. Once I was done with the claws I pretty much had all the detail done on the body before the firing so I moved on to the wings. By this time the "bone" structure was dry enough so from this point I made a few slabs. Owl wings are very large and flat. They are also close together and have virtually no gap between feathers aside from the end of the wing. This would not work. The bone structure wouldn't be able to support this weight so I had to find an alternative. I decided a simpler, more stylized approach would be best. So, I made the wing shape out of individual feathers that were farther apart. To do this, I used the slabs I had made and cut out feather shapes. Once I had enough I held the bone structure up to the owl to find the best placement for each individual feather to get the flow of the wing down. Once I found the location I wanted, I scored that spot and attached the feather having it protrude off the surface of the bone. I repeated this process for each feather on each wing until I was happy with the shape that the feathers suggested. I wasn't done here though. Owls also have smaller feathers that come off the top of the wing that add what is essentially another layer of feathers. To do this I made more slabs and cut them to the form of the wing shape. Once I had the layers I needed I attached them to the bone structure. I carved out each individual feather from the slab at this point. I repeated this process for each layer I did and for the other wing as well. Now the hard part was how I was going to attach the wings after the components were fired. I eventually settled on having a rod of clay come out of the wing and having a hole in the owl where I could stick it after the firing. I found the ideal placement and made the hole. I also had to build that part of the owl up so it flowed into the wings nicely. At this point I was ready to fire and did so. I prayed that it came out of the kiln fine and it did. I went to attach the wings to the body and noticed that if I had the wings at a certain angle I could rest them on the back side of the owl and they would essentially support themselves. To add an extra layer of rigidity I used an epoxy paste in the hole the wings stuck into and finally put the owl together completely. Once they dried I was able to use a putty paste to fill in the gaps that were between the wings and the body. I did this to make the body flow into the wings even better so they looked as though they were once solid piece. After the putty dried I painted the whole sculpture with black acrylic paint. Once the paint dried, I dry brushed a metallic silver paint over the whole owl, except for the face and large feathers. I thought the face looked deeper and more menacing as just black, and I had another plan for the feathers. For the feathers I used a gold metallic paint but instead of dry brushing I just painted it directly onto the feathers. Once that dried a little I scratched a lot of it off so it looked aged and not so strong. This fit the aesthetic I was looking for. I also used silver metallic paint on the section of the legs where the claws would be to make them "pop". Once the owl was finished I needed to find a base. Originally I was using a piece of wood and a block that was hot-glued to the surface of it with a hole the pvc pipe went into, but this was not stable enough as the block peeled off the board several times at that point. I was able to find a nice thick piece of wood that almost resembled driftwood, but in a lighter color. This made the piece look natural and fit the aesthetic I was hoping to achieve. I sanded the wood block, punched a hole into it to support the pvc piece that held the owl, and sprayed it with lacquer to seal it and give it a subtle glossy look. The fit with the pipe and the hole was not as snug as I had hoped for so I needed to layer the inside of the hole with a few pieces of tape and it was good to go. I then presented the owl alongside a mouse that I made that was meant to be the prey the owl was swooping down for. I also made a rock for the mouse to sit on, but the piece that I applied with is not about the mouse and rock, that was just for my school art show. In the pictures that were submitted the base-plate is not shown because it would not fit into the area where I took the pictures. I was happy with my finished product and felt that it was one of my better works. My ceramics teacher suggested that I enter it into this competition and I felt that it was strong enough to be a canditate for the show. Thanks for reading my statement on my piece. |
| Dimensions: | (L)18 x (W)18 x (H)18 (Inches) |
| Weight: | 14 Lbs. |
| School: | Linn-Mar High School - Marion, IA |
| Teacher: | Angie White |
| Exhibition: | The 23rd Annual National K-12 Ceramic Exhibition |
Recognition

Additional Work Info
| Clay Vendor: | Other, Continental Clay |
| Wheel Vendor: | Other, Handbuilt |
| Tool Vendor: | Other, Kemper |
| Glaze Vendor: | Other, cold finish |
| Kiln Vendor: | Skutt |
| Firing Temp: | Low Fire |
| Atmosphere: | Other |
| Cone Number: |
Entry Photos

Front Photo

Back Photo

Left Photo

Right Photo

Top Photo